Being a lab
scientist is a funny business in some respects. You end up knowing
and caring about some pretty esoteric stuff, like the infinite
grades, purities and types of water, or the slight differences in
tactile sensation from pipetting different viscosity liquids.
One such matter
that likely preys on the average bench scientist's mind more than the
global average is the right choice of marker pen for writing very
small on tiny plastic tubes. In my particular case, most of the tubes
that I use most frequently come from the Eppendorf
DNA LoBind range (on account of the problem
with using standard polypropylene tubes for working with DNA).
The particular
problem in this case is that whatever it is that's added to the
plastic to discourage DNA binding seems to make it particularly
reluctant to take the ink of a marker well. Given the importance of
getting enough information onto the tube, come hell or high
water long term frozen storage or spilt ethanol, this can be
a problem. However it's one of those problems that's never really
that important to solve – you just keep buying the same markers and
fudging along as best you may, right?
Well
not this time! Part of the joy of starting a new position is that you
get to start doing things from the beginning that you wished you'd
been doing earlier towards the end of the last position, so that's
what I did regarding pens. I ordered in a
selection pack, and tested it alongside the pen
my lab was currently stocking
(fig.
1).
 |
|
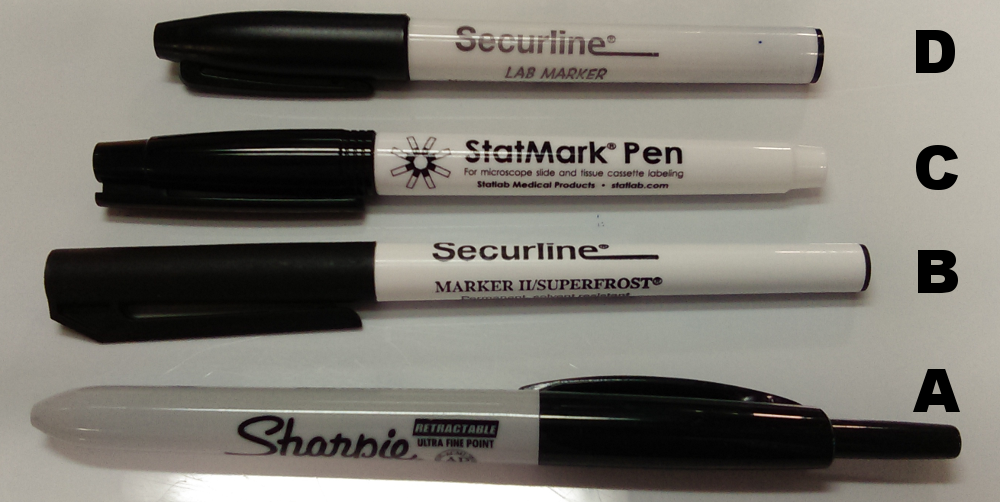
Figure 1: The contenders.
From bottom to top: (A) a Sharpie (ultra fine point,
retractable); (B) a Securline Marker II/Superfrost; (C)
a StatMark Pen (for microscope slides), and (D) a Securline
lab marker. Note different sizes is an illusion; photo was taken at
an angle.
|
First things
first, let's compare the ink-to-plastic interfaces, that is to say,
the nibs (fig. 2). Three of the tips are pretty similar (A-C), being
fine point hard tips. Of these three only the Sharpie (A) stands out
as it's a clicky retractable tip, which is convenient as there's no
lid to lose. The thick tip lab marker from Securline (D) has a
bigger, slightly softer chisel tip (much like the VWR markers I used
a lot in London, which periodically seem to disappear from the
lists).
 |
|
Figure 2: The nibs of the
different markers.
|
The first test:
how well do they actually write? Fig. 3 shows the results of writing
the same message on four different LoBind tubes. All three of the
fine tips have pretty reasonable contrast, although I think the
StatMark may have gone on slightly easier. The chisel tipped
Securline produced the thickest yet faintest text.
 |
|
Figure 3: The results of
writing the same test message on four different LoBind tubes.
|
After writing on
the tubes, I wanted to test the ability of the text to stand up to
the solvent that's most likely to be a problem in the setting of my
work: alcohol. Each tube top received a 15 ul drop of 70% ethanol in
the middle, before giving it a couple of firm wipes with a paper
towel, in order to model the kinds of exposure a tube might receive
say mid-purification. The results are shown in fig. 4, revealing that
only the two Securline markers pass the test (which isn't so
suprising, given that they are marketed specifically as solvent
resistant).
 |
|
Figure 4: The ethanol test.
Top panel shows the pre-exposure tube, bottom panel shows
post-ethanol. A = Sharpie, B = Securline Superfrost, C = StatMarker,
D = Securline lab marker. Note that the top panel was taken about
five minutes after the shots in fig. 1 and provides relative contrast
in a single frame. Shame about the photo in the second panel.
|
The last remaining
test is the smudge test, as anyone who has had to label 50 different
tubes by hand in a hurry can attest that things can get a bit on the
messy side. In this test, I simply wrote 'smudge' on the side of the
tube (à la Misery) and immediately gave it a quick wipe with a
gloved thumb to see how well the ink had set. Fig. 5 reveals that in
this test it's the standard Securline lab marker that did best, with
the StatMarker coming in second.
 |
|
Figure 5: Results of the
smudge test.
|
This is by no
means a rigorous assessment – it's all incredibly qualitative, the types of tubes tested being one, and there's a complete lack of technical
repeats* – but it's certainly the most
thorough investigation into lab marker suitability I've done. For what it's
worth, these data have informed my labpenmanship in the following
ways:
- Due to it's ease of writing, clarity and durable contrast, I'm going to write on the tops of my tubes with the StatMark. This should make them easier to read in a freezer box.
- However, due to it's lack of solvent resistance, I need some backup labelling on the side, which I'll do with the Securline Marker II/Superfrost, as it's decent to write with and should hold up well in the event of rogue wash getting splashed around.
- The other markers still have a place though: the thick tip Securline is perfect for labelling larger, Falcon-style tubes, while the Sharpie is good for annotating the gels in my labbook (which means I can leave the tube-labelling markers in my clean PCR hood and keep everything gloriously separate).
I hope
it might be useful for others, and would be interested to know if
anyone has had success with other markers, or with these markers on
tubes other than the DNA LoBinds.
*Having gone to this effort I briefly toyed with the idea of writing this up as a tongue in piece manuscript, but then I thought of the reviewer comments that even I would give this so I passed