Thursday 10 November 2016

Installing Trinity on Mac OS X via homebrew -- update

A couple of months ago I wrote a short post about how I managed to install the RNA assembler Trinity on Mac OS X (El Capitan), on the off-chance it would be useful to someone else.

This morning I received an email from my friend Mazlina, who I worked with in London, saying she had been trying to do just that and had coincidentally stumbled on my post*. However it hadn't worked out quite as easily for her as it had for me.

It turned out to be due to a Java version problem. While 1.8 was installed, brew --config claimed that only 1.6 was, which is insufficient for Trinity installation.

Here's how she solved it, quoting from her email:

"First, I did
brew doctor
and just cleared up whatever it told me to [...]

$ brew doctor
Your system is ready to brew.

So by running
brew cask search java
it lists down the available java versions (the one you have, 8, is just java), and I went with 9-beta because that was the only one I could download at that time. And when I ran 

$ brew cask install java9-beta
$ brew install trinity
worked like a charm.

Not sure if that's exciting enough to go on the blog, but it solves it anyway."

(For reference, as I told her, given the average excitement level of the blog this should fit right in!)

* I'm never really sure whether these posts are read or not (as the stats from Blogger are always inflated by scanning bots) apart from when people let me know they've seen them - so if you ever bump in to me at a conference or something and have found one of them useful or interesting please let me know, I love to hear about it!

Friday 4 November 2016

Cheap protocol for DNA extraction from agarose

I've just stumbled across this lovely paper from Sun et al., which reports a delightfully cheap and simple technique for extracting DNA from agarose gel slices.

Basically it's straightforward as poking a hole in the bottom of a .5 ml microcentrifuge tube, then nesting that inside a 1.5 ml tube. Some cotton or glass wool then goes in the bottom of the .5 ml tube, with your agarose slice containing your excised DNA band on top, and you just spin it through;  apparently the agarose gets retained on the wool and the aqueous phase gets spun to the lower compartment.

DNA gel extraction kits aren't the most expensive thing you're likely to buy (at about £1.50/$2 per tube), but if you do them occasionally it might be worth trying it out for the time saving: if you are doing lots regularly, it might well save a pretty penny.

Saturday 29 October 2016

...but which pen is mightiest?


Being a lab scientist is a funny business in some respects. You end up knowing and caring about some pretty esoteric stuff, like the infinite grades, purities and types of water, or the slight differences in tactile sensation from pipetting different viscosity liquids.
One such matter that likely preys on the average bench scientist's mind more than the global average is the right choice of marker pen for writing very small on tiny plastic tubes. In my particular case, most of the tubes that I use most frequently come from the Eppendorf DNA LoBind range (on account of the problem with using standard polypropylene tubes for working with DNA).
The particular problem in this case is that whatever it is that's added to the plastic to discourage DNA binding seems to make it particularly reluctant to take the ink of a marker well. Given the importance of getting enough information onto the tube, come hell or high water long term frozen storage or spilt ethanol, this can be a problem. However it's one of those problems that's never really that important to solve – you just keep buying the same markers and fudging along as best you may, right?
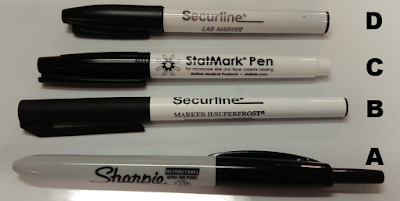
Well not this time! Part of the joy of starting a new position is that you get to start doing things from the beginning that you wished you'd been doing earlier towards the end of the last position, so that's what I did regarding pens. I ordered in a selection pack, and tested it alongside the pen my lab was currently stocking (fig. 1).

Figure 1: The contenders. From bottom to top: (A) a Sharpie (ultra fine point, retractable); (B) a Securline Marker II/Superfrost; (C) a StatMark Pen (for microscope slides), and (D) a Securline lab marker. Note different sizes is an illusion; photo was taken at an angle.
First things first, let's compare the ink-to-plastic interfaces, that is to say, the nibs (fig. 2). Three of the tips are pretty similar (A-C), being fine point hard tips. Of these three only the Sharpie (A) stands out as it's a clicky retractable tip, which is convenient as there's no lid to lose. The thick tip lab marker from Securline (D) has a bigger, slightly softer chisel tip (much like the VWR markers I used a lot in London, which periodically seem to disappear from the lists).

Figure 2: The nibs of the different markers.
The first test: how well do they actually write? Fig. 3 shows the results of writing the same message on four different LoBind tubes. All three of the fine tips have pretty reasonable contrast, although I think the StatMark may have gone on slightly easier. The chisel tipped Securline produced the thickest yet faintest text.


Figure 3: The results of writing the same test message on four different LoBind tubes.

After writing on the tubes, I wanted to test the ability of the text to stand up to the solvent that's most likely to be a problem in the setting of my work: alcohol. Each tube top received a 15 ul drop of 70% ethanol in the middle, before giving it a couple of firm wipes with a paper towel, in order to model the kinds of exposure a tube might receive say mid-purification. The results are shown in fig. 4, revealing that only the two Securline markers pass the test (which isn't so suprising, given that they are marketed specifically as solvent resistant).
 

Figure 4: The ethanol test. Top panel shows the pre-exposure tube, bottom panel shows post-ethanol. A = Sharpie, B = Securline Superfrost, C = StatMarker, D = Securline lab marker. Note that the top panel was taken about five minutes after the shots in fig. 1 and provides relative contrast in a single frame. Shame about the photo in the second panel.
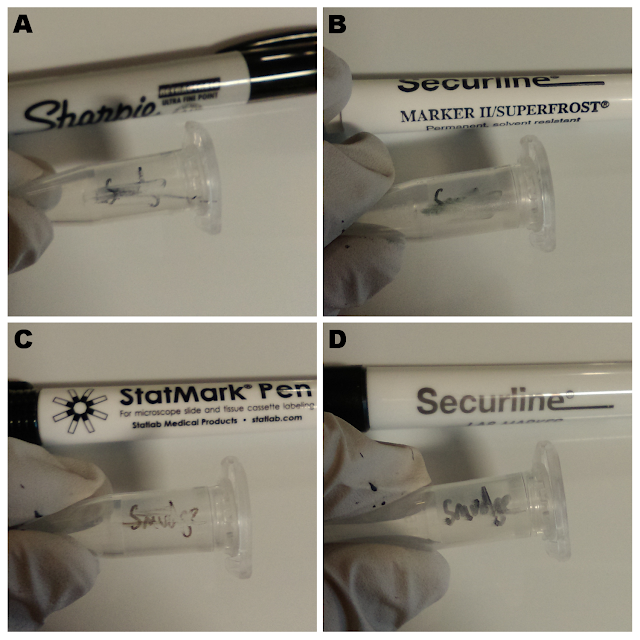
The last remaining test is the smudge test, as anyone who has had to label 50 different tubes by hand in a hurry can attest that things can get a bit on the messy side. In this test, I simply wrote 'smudge' on the side of the tube (à la Misery) and immediately gave it a quick wipe with a gloved thumb to see how well the ink had set. Fig. 5 reveals that in this test it's the standard Securline lab marker that did best, with the StatMarker coming in second.

Figure 5: Results of the smudge test.
This is by no means a rigorous assessment – it's all incredibly qualitative, the types of tubes tested being one, and there's a complete lack of technical repeats* – but it's certainly the most thorough investigation into lab marker suitability I've done. For what it's worth, these data have informed my labpenmanship in the following ways:
  • Due to it's ease of writing, clarity and durable contrast, I'm going to write on the tops of my tubes with the StatMark. This should make them easier to read in a freezer box.
  • However, due to it's lack of solvent resistance, I need some backup labelling on the side, which I'll do with the Securline Marker II/Superfrost, as it's decent to write with and should hold up well in the event of rogue wash getting splashed around.
  • The other markers still have a place though: the thick tip Securline is perfect for labelling larger, Falcon-style tubes, while the Sharpie is good for annotating the gels in my labbook (which means I can leave the tube-labelling markers in my clean PCR hood and keep everything gloriously separate).
I hope it might be useful for others, and would be interested to know if anyone has had success with other markers, or with these markers on tubes other than the DNA LoBinds.
*Having gone to this effort I briefly toyed with the idea of writing this up as a tongue in piece manuscript, but then I thought of the reviewer comments that even I would give this so I passed

Thursday 20 October 2016

Freezer box tube storage templates

As I settle in to my new postdoc position, in a relatively newly established lab,  I've been setting up my lab management techniques.

One of the things that's always bothered me is the best way to record what tubes are in which box in the freezer. On one hand, a straight up list is most convenient for typing and copying, while on the other a table showing what's in which position is more intuitive and convenient for printing.

In my previous labs I've always worked with existing templates, or within a particular framework. This time around though it's a reasonably fresh start – and I'm also still in that lag phase where I'm still waiting for most of my reagents to be delivered – so I thought I'd take the opportunity to whip up a nice solution that addresses both issues before I lay down too many tubes.

The fruits of my labour can be downloaded from GitHub

Basically the idea aims to combine the ease of entry of a simple vertical table, with the easy visualisation of a coordinate table system. So you can copy and paste rows of data on the tall table on the left, then the spreadsheet auto-fills in the appropriate cells on the table on the right which can then be selected and printed for pasting into your lab book. 

If you don't like the exact entry fields that I used you can also change the headings of the table on the left. I would however encourage you to use some marker of the appropriate lab book entry, which is something many forms (including my old ones) omit: in an ideal world, given any tube you should be able to find out all it's information (or vice versa), so this information is vital.

There's a 9x9 and a 10x10 format available. If anyone does use it and have any thoughts I'd love to hear about it.

Thursday 29 September 2016

Installing Trinity on Mac OS X

One of the inevitable joys of bioinformatic life is the installation of a variety of esoteric softwares on a variety of system. As I've just moved to a new position in a new institution, I get to go through this rigmarole again.

This time around I have an extra layer of faffery, as I am now for the first time using a Mac (having been on Ubuntu for the last ten years, and Windows in the distant recollections from before that). While the machine is gorgeous and responsive, I am still in the interminable murky phase where I don't know the intricacies and easy ways of doing things yet (and am still battling muscle memory for keyboard shortcuts!), which means that I'm back down the learning curve a little.

Anyway, as I've just discovered an incredibly easy way to install a very useful tool, I thought I'd share it.

I was installing the excellent RNA assembler Trinity on my iMac running OS X (El Capitan), or at least trying to, according to its website. However, despite attempts at using different (and newer) compilers, I kept running into this error, presumably reflecting my attempts at using alternative compilers failing:

clang: error: unsupported option '-fopenmp' trinity mac

Happily it turns out that Trinity is supported by the fantastic third party package manager homebrew, which I had coincidentally just installed anyway (you don't bundle wget in, what the heck Apple?).

Homebrew is easily installed following the details on their website, and then installing Trinity was as simple as this:

brew cask install java
brew install homebrew/science/trinity


Not only was this dead simple, but it automatically installed a number of other programs (as dependencies of Trinity) that were on my list to install anyway (e.g. trimmomatic and bamtools). It also installs everything directly to /usr/local/bin/, so there's no mucking about with your PATH required. Lovely.

NB: Whilst looking around for hints as to how to solve this problem, I did find this thread on SeqAnswers which suggests that you might need to take a little extra care when running Trinity on Mac systems as opposed to Linux. Something to bear in mind.

Friday 26 August 2016

Count how many MiSeq reads derived from each surface of the flowcell

I recently had call to perform one of those tasks that I think others might, yet not be entirely sure how to go about it.

Specifically, in troubleshooting a MiSeq run's poor yield, I wanted to see whether there were significantly more reads derived from one of the flow cell surfaces (top or bottom) relative to the other. The reason I did this was my FWHM (full cluster width at half maximum, a measure of the focus during imaging) was noticeably higher for that surface.

I mean, I have no idea if ~3 is that much worse than ~2.8-2.9, but there's no harm in checking right?
This is very easily achieved as all of the information required to work it out is contained within the FASTQ reads themselves, in tile section of the identifier line of each each.

Therefore with a quick bit of basic bash we can find out exactly how many reads derived from each surface.

# Get all index reads (as the shortest) in one file
zcat *I1*z > I1.fq

# Extract the identifier lines with sed
 # and grep for those with a '1' at the right position
 # This indicated they derived from the top surface
sed '2~4d;3~4d;4~4d' I1.fq | grep ^.............................1 -c

# Do the same for '2', i.e. the bottom surface
sed '2~4d;3~4d;4~4d' I1.fq | grep ^.............................2 -c

And there you have it. Simple, quick and effective.

(As it turned out I have almost equal numbers derived from both surfaces, so it wasn't to blame in my case, but this might be useful for other situations!)

Thursday 25 August 2016

One laboratory, en suite sauna


In lieu of an actual proper scientific blogpost this week, here I recount a recent lab horror story that struck me. With thanks to my labmates sending me the freezer traces:
Sunday evening. Kicking back at home, something vaguely distracting on the telly. Doing the chores, which on this occasion included last minute packing in preparation for storing our belongings before leaving the country. Everything was all on track for a nice quiet and productive night in. Until a phone vibrates.
20:08, G: “Hello team. Freezer temp has alarmed at -59 just now. Anyone using it? Anyone around in lab?
Hmm that's a bother. Hopefully someone's just pulling a long weekend shift, maybe came in to bank a long point in a time course and was just being a bit slow to close the freezer after. If that's the case then they'll close it and this will blow over. Let's just wait a while and see who's there...anyone?
20:15, D: “The other freezer in that room is reading -62, might just be hot in there
Oh bugger, now they're both going. Luckily these alerts also go to a lab manager, he's a good guy, always on the ball, he'll sort it.
Except nope, no reply. Wait, is that it levelling out?
Hope indeed!
21:04, G: “sorry to report, there was no plateau - i think we have to do something tonight
Double bugger, because guess who lives closest?
21:19, me: “I am nearby
21:20, me: “If emergency action is called for
In I go, let's see how bad it is on the ground... And it's sweltering. No AC. No air movement. A small room with six giant -80s, all shrieking in concert if not in sync.
The blue ribbon rises as the sweat rolls down...
Running around, begging security for help, ringing managers, moaning on Whatsapp, come on come on, let's check the thermometer again...
Scorchio.
It would have kept rising except here I propped open the fire door from the freezer room into the neighbouring lab, corridor, and convinced security to come and open the fire door to outside for a moment, giving a few blessed minutes of relief.
It doesn't last. The fire alarm decides to join the chorus, and thus the external door must close.
We need to move this cursed muggy miasma of stale heat, but where to go, and how to get there? Enter our trusty friend, the humble wedge. Let's prop open another door into the lab next door, knocking the smug grin off its air-conditioned face.
The good news starts to filter in.
Down to 39.5ºC on the thermometer; still fit for a steam room, but going in the right direction – we just need to speed this up. Let's go lab rustling!
Now we've got some circulation. It's still hot as heck, like standing in front of a giant hairdrier, but at least it's moving.
And there was much rejoicing
22:58, D: “Second Alert cancelled, you are a hero Jamie
23:06, T: “Jamie = hero 🏆
23:08, G: “Good thing he's not leaving for Boston or something...
23:09, G2: “Brilliant! Thanks Jamie!
23:09, Me: “Room is 38 now, so I think I can go home
Lauded in the Whatsapp group, my name will be rejoiced throughout the lab, and I get to go home to continue packing my belongings. All in a day's work, for The Postdoc That Lives Nearest The Lab!